Booking Details
Introduction
Section titled “Introduction”The Booking Details page provides a comprehensive view of an individual transfer or tour booking. From here, you can view all booking information, manage the booking status, assign operators, handle payments, add extras, and communicate with the customer.
The Booking Details page is organized into several sections:
- Booking details - Route and journey details
- Contact Information - Customer details
- Operator - Assignment and vehicle
- Payment Information - Pricing and billing
- Payments - Payment records and deposits
- Extras - Additional services
- Messages - Customer communication
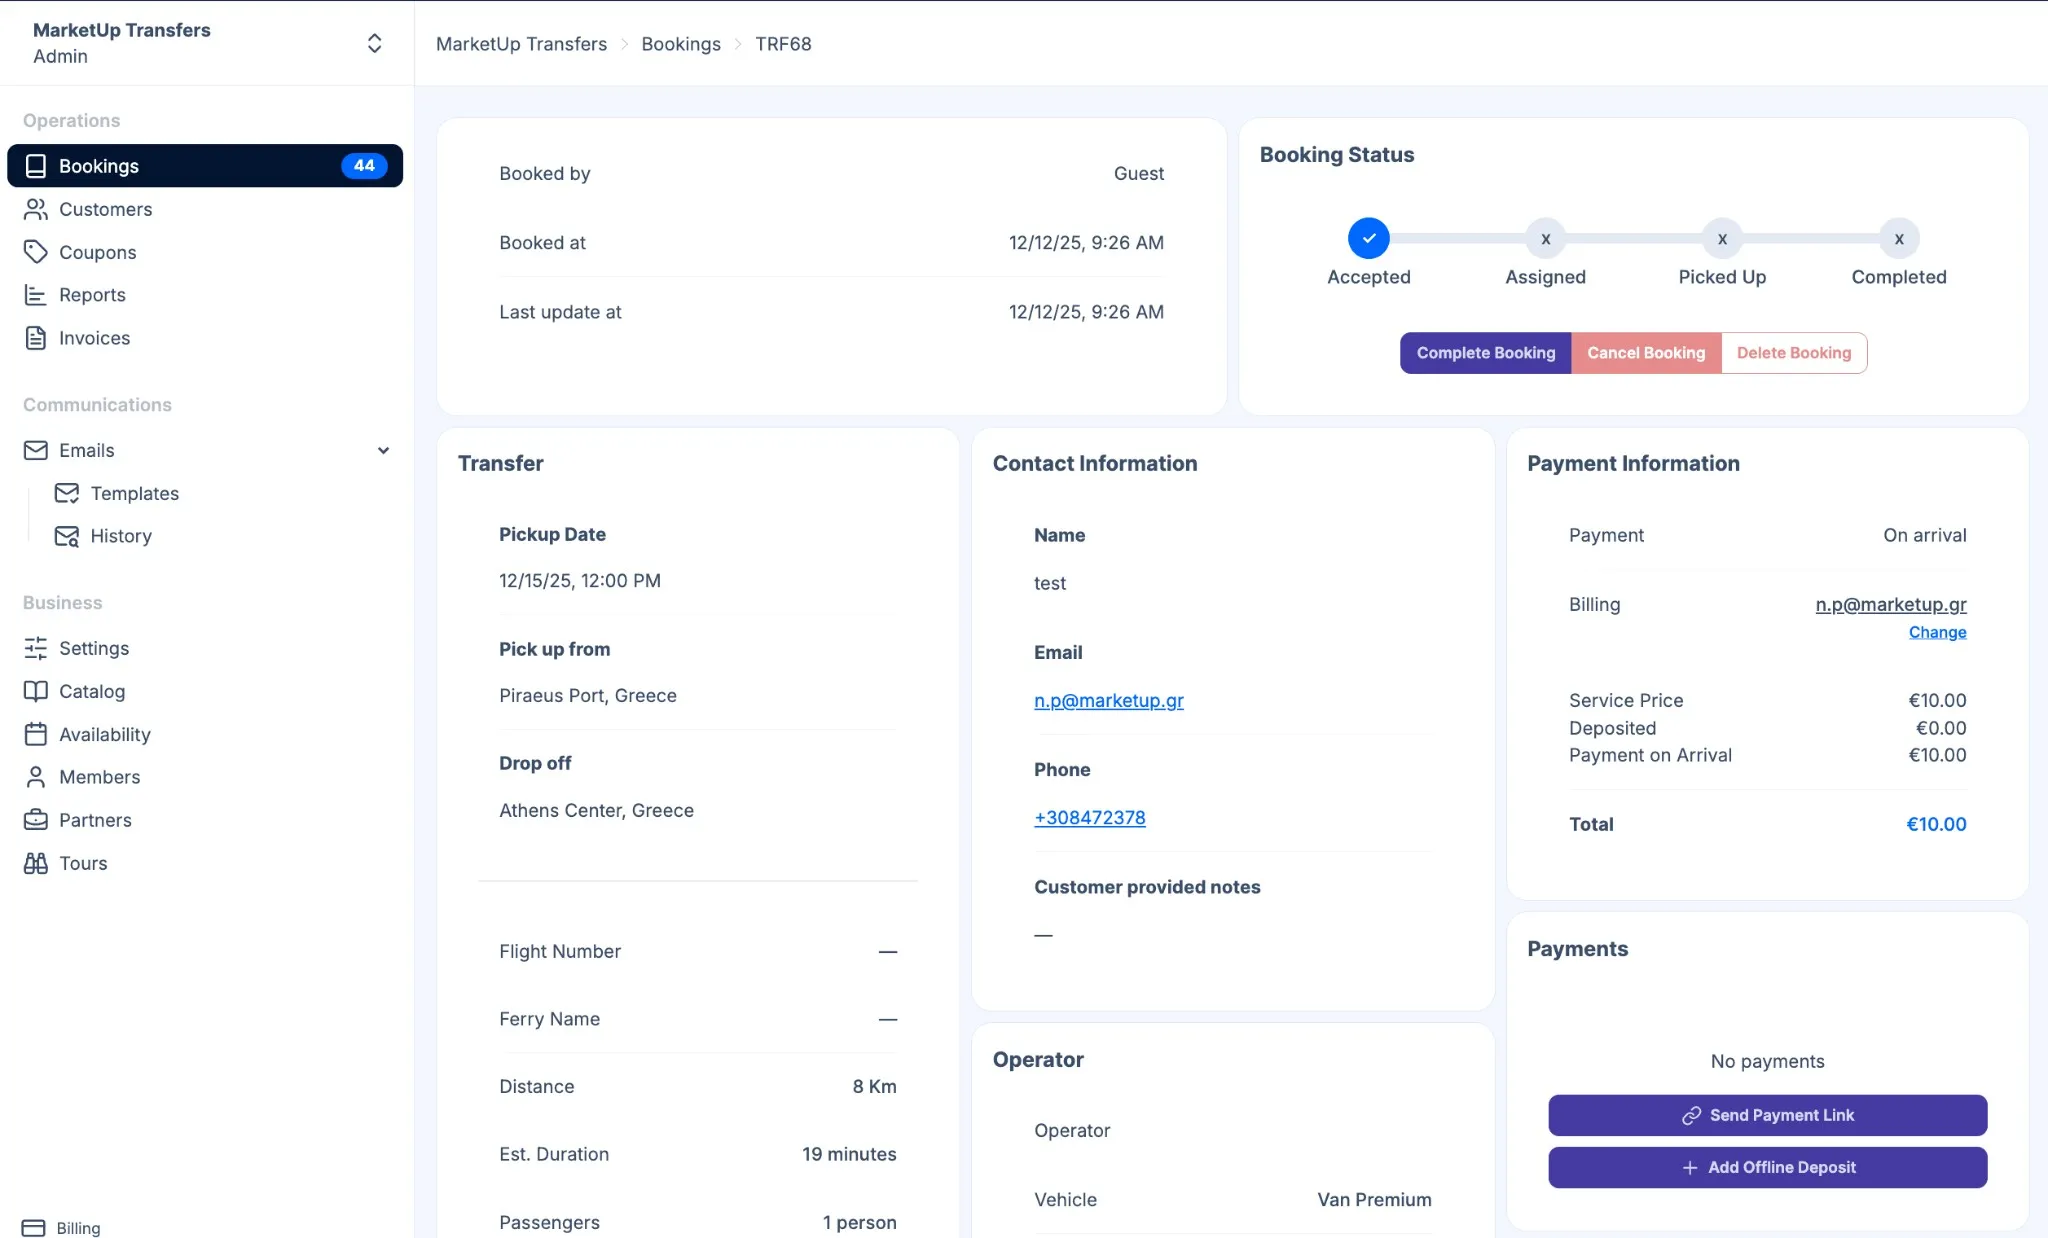
Header Section
Section titled “Header Section”The header displays miscellaneous booking information and status workflow.
| Field | Description |
|---|---|
| Booked by | Who created the booking (Guest or user) |
| Booked at | Date and time the booking was created |
| Last update at | Date and time of the most recent change |
Status Workflow
Section titled “Status Workflow”The right side of the header shows the booking’s progress through the status workflow:
- Accepted - Booking has been received and confirmed
- Assigned - An operator/driver has been assigned
- Picked Up - Customer has been collected
- Completed - Transfer has been finished
A checkmark indicates a completed stage, while an “x” indicates a pending stage. For full details on each status and transition rules, see Status Workflow.
Changing Status
Section titled “Changing Status”To change the booking status, use the action buttons below the status progress bar:
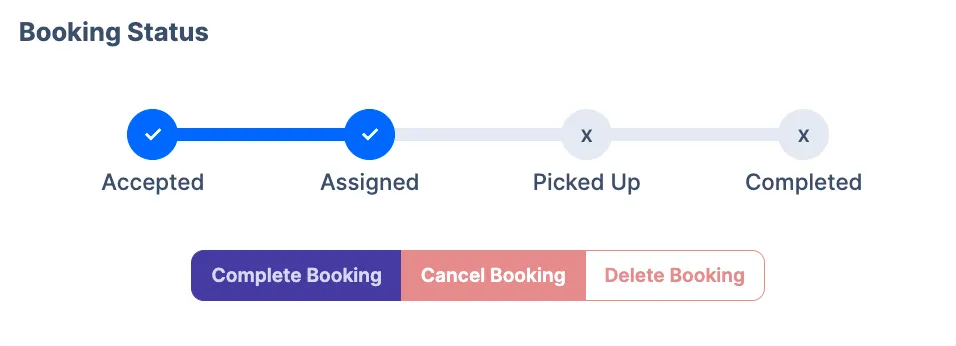
Complete Booking
Section titled “Complete Booking”The Complete Booking button (purple/blue) allows you to quickly advance the booking to Completed status. This button typically appears when the booking is in Assigned or Picked Up status.
When you click Complete Booking:
- The booking status changes to Completed
- The progress bar updates to show all stages completed
- Email notifications may be sent to the customer (depending on your Email Templates settings)
- The booking moves to your completed bookings list
Cancel Booking
Section titled “Cancel Booking”The Cancel Booking button (red) allows you to cancel the booking. This button is available for bookings that haven’t been completed yet.
When you click Cancel Booking:
- The booking status changes to Cancelled
- The booking is voided and no transfer will take place
- The booking record is preserved in the system
- Email notifications may be sent to the customer (depending on your email template settings)
- The booking will appear in your cancelled bookings filter
Delete Booking
Section titled “Delete Booking”The Delete Booking button (light red/pink with border) permanently removes the booking from the system. Use this action with caution.
When you click Delete Booking:
- A confirmation prompt will appear (you must confirm the deletion)
- The booking is permanently removed from the system
- This action cannot be undone
- The booking will no longer appear in any lists or reports
When to use Cancel vs Delete:
- Cancel Booking - Use when a customer cancels or you need to void a booking but want to keep records for reporting, accounting, or customer service purposes
- Delete Booking - Use only when you need to permanently remove a booking (e.g., test bookings, duplicate entries, or data cleanup)
Transfer Section
Section titled “Transfer Section”This section displays all journey-related information:
| Field | Description |
|---|---|
| Pickup Date | Scheduled date and time for pickup |
| Pick up from | Pickup location address |
| Drop off | Destination address |
| Flight Number | Customer’s flight number (if provided) |
| Ferry Name | Ferry information (if applicable) |
| Distance | Calculated route distance in kilometers |
| Est. Duration | Estimated journey time |
| Passengers | Number of passengers |
| Luggage | Number of luggage pieces |
Click the Edit button to modify transfer details.
Flight Tracking
Section titled “Flight Tracking”When a flight number is provided, TransferVista can track the flight status. This helps you:
- Monitor for delays
- Adjust pickup times accordingly
- Keep customers informed
Operator Section
Section titled “Operator Section”This section shows driver assignment information:
| Field | Description |
|---|---|
| Operator | Assigned driver’s or partner’s name (empty if unassigned) |
| Vehicle | Vehicle type for this booking |
| Commission | Operator’s commission amount |
If no operator is assigned, click the Assign button to assign a driver. See Assigning Operators for more details.
Payment Information Section
Section titled “Payment Information Section”This section displays pricing and billing details:
| Field | Description |
|---|---|
| Payment | Payment method (On arrival, Online, etc.) |
| Billing | Customer’s billing email (linked to customer profile) |
| Transfer Price | Base price for the transfer |
| Deposited | Amount already paid as deposit |
| Payment on Arrival | Amount to be collected at pickup |
| Total | Total booking amount |
Payments Section
Section titled “Payments Section”This section shows all payment transactions for the booking:
- List of recorded payments with amounts and dates
- Add Offline Deposit button to record cash or manual payments
- Send Payment Link button to email a payment link to the customer
Recording Offline Payments
Section titled “Recording Offline Payments”If a customer pays via cash, bank transfer, or other offline method:
- Click Add Offline Deposit
- Enter the payment amount
- Add any notes about the payment
- Save the payment record
Payment Link
Section titled “Payment Link”If the booking is unpaid, you can send a payment link to the customer. The payment can be partial or full. You must have online payments enabled to use this feature.
Extras Section
Section titled “Extras Section”Additional services booked with the transfer:
- List of extras (child seats, meet & greet, etc.) with prices
- Add Extra button to add additional services
Adding Extras
Section titled “Adding Extras”To add an extra to the booking:
- Click Add Extra
- Select the extra service from the list
- Confirm the addition
The booking total will be updated automatically.
Messages to Customer Section
Section titled “Messages to Customer Section”This section allows you to communicate directly with the customer:
- View history of messages sent to the customer
- Send Message button to compose a new message
Sending Messages
Section titled “Sending Messages”To send a message to the customer:
- Click Send Message
- Compose your message
- Send the message
Messages are sent to the customer’s email address.
Related Pages
Section titled “Related Pages”- Assigning Operators - Learn about driver assignment
- Status Workflow - Understanding booking lifecycle
- Payments - Payment handling in detail